 |
| Everything started here. Fuchur needed a new dress. |
 |
| So the old layers of paint had to go down first. |
 |
| First very brutal with 80s grain. |
 |
| Then with 150 grain, 240 grain, 320 grain and finally with 400 grain. |
 |
| Next came all fittings down. |
  |
| And grind again! Here, three layers of one-component paint had to be removed. The worst thing was that you could not work with the machine almost anywhere - so drag everything by hand ... Again with 80, then 150 and finally with 240 grain. |
 |
| After all the sanding dust was removed and everything cleaned and treated with silicone remover, the first time it was taped. For imitators: You need in the course of the refit tons of masking tape! |
 |
| Then it started with priming. Since I wanted to use a 2K paint, of course, the substrate had to be 2K. After good advice from Sönke, I chose Interprotect from International. |
 |
| After the second course primer I went back to the grinding. The surface should of course be nice and smooth for the paint. With 320er grit again everything by hand loops (there comes a moment where you cant open your fingerprint iphone no longer because you have no more fingerprint !!). |
 |
| After the second time let the paint dry properly at least 48 hours. And then grind again. This time the nice shiny layer with 400 grain grind again dull. It comes the time where you just have no desire to grind. If someone had approached me and had bid for 100 euros, I would have sold the boat! But it does not help, you have to go through it! When the third coat of paint was applied, however, you are rewarded by an incredibly good result. |
 |
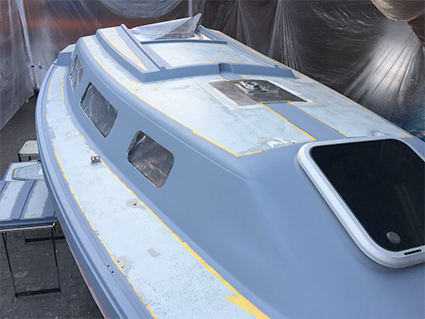
| After everything had dried everything was taped again. For the treads I have decided for kiwi grip. The stuff is great! Applied quickly, with the structural roller distributed so long until you like the surface and done! |
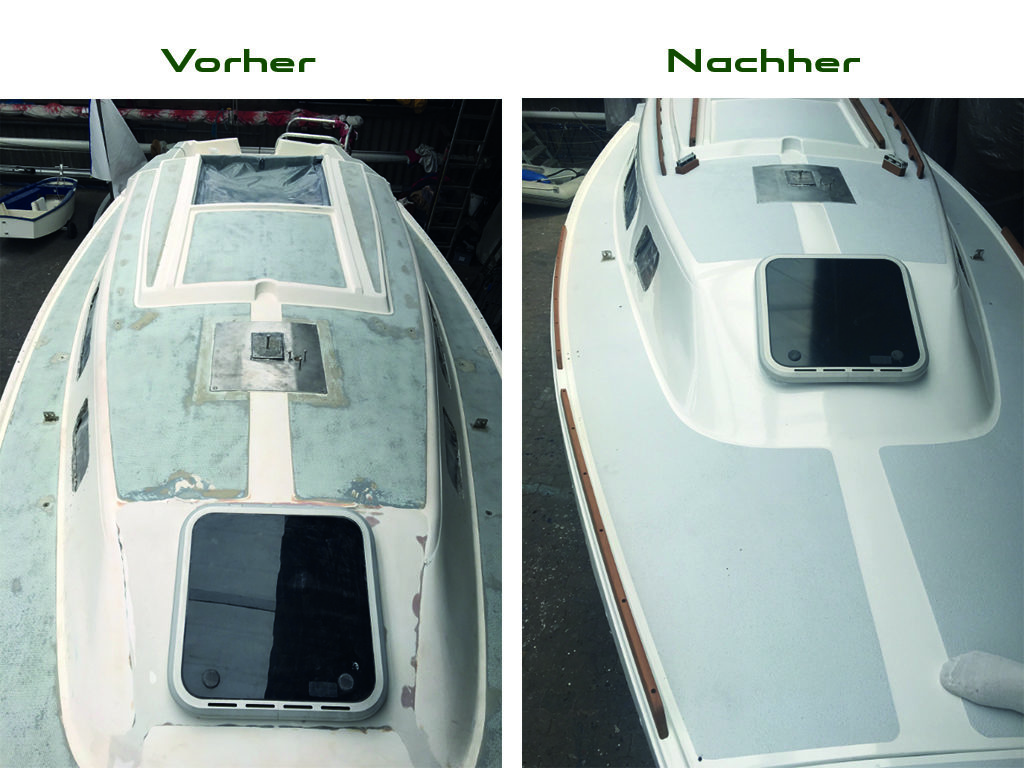 |
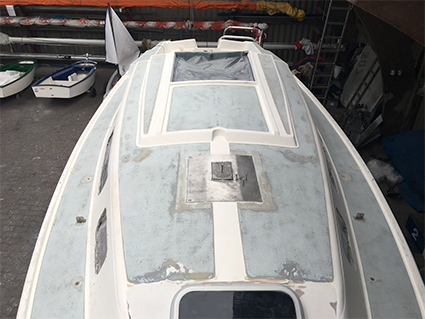
| Here is a picture of after thegrinding and before painting - it was absolutely worth it! |
 |
| Then came the big day of foliation! Marie and Sascha are my personal heroes when it comes to filming! It was started at the rear which was finished after a few minutes (!). Ich bekam ein Lob von den beiden für die gute Vorarbeit. So ging das Bekleben zügig voran. |
 |
| After the stern, the starboard side was tuned. In one piece, the film was pulled on the boat long and provisionally glued and cut very roughly. |
 |
| Then everything went very fast again! With skilful movements Sascha conjured the foil on the hull and Marie pulled off the carrier paper. |
 |
| After only 2 1/4 hours the whole boat was finished! Again, I made the right decision! It has become absolutely flawless. No wrinkle, no bubble - just perfect smooth! I just say that it's better than painting. And faster. And cheaper. |
 |
| Now a protective film over it, because everyone wanted to "see" the boat. Strange way, but all look with their fingers and not with the eyes. No idea why all people must necessarily touch? That's just like in the spring just before the boats go into the water. Everybody has to feel that the antifouling is already dry (?). Here it was of course even more exciting because it is the first boat in the club that has been foiled. "Does that really last?" - "Where is the seam, I see and feel nothing". Die häufigste Frage war und ist: "Was wenn du einen Kratzer hinein fährst?" Ja was dann... Mit dem Heißluftfön das Material auf Platz schieben oder die Seite neu. Gegenfrage: Was wenn man in neuen Lack eine Schramme reinfährt? Oder in nagelneues Gelcoat? Ärgerlich ist es in allen Fällen! |
 |
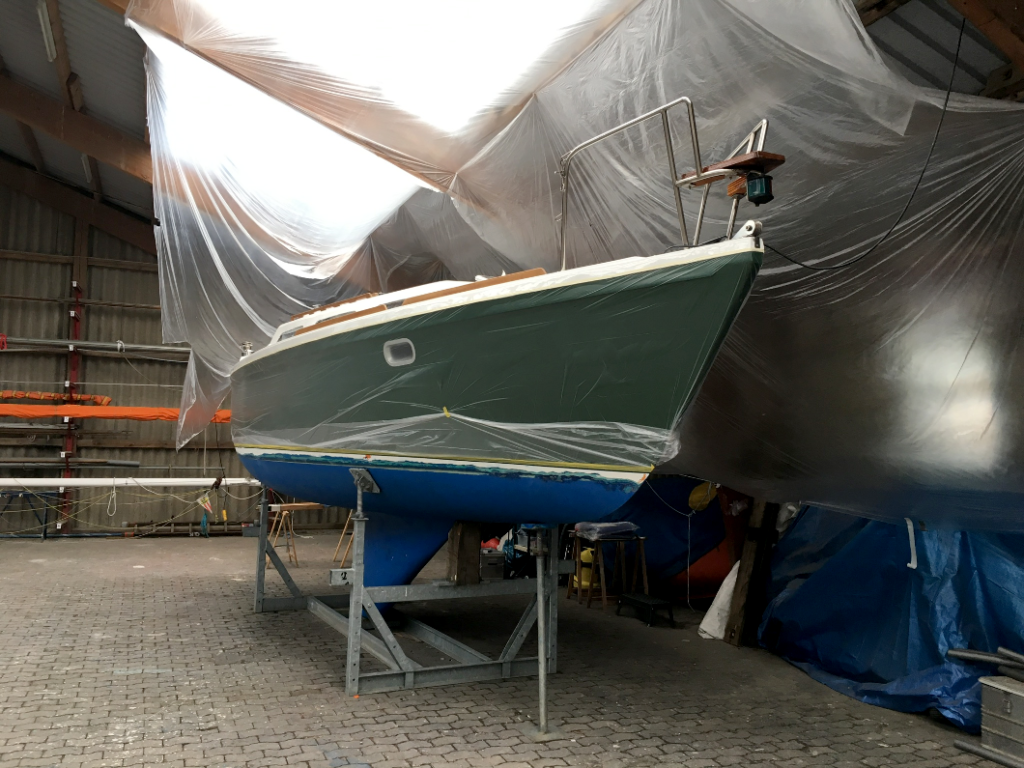
| The old blue antifouling had to give way to a black one. |
 |
| Then the water pass and a new skirting board. |
 |
| Now Marie and Sascha came into play again. The decorative stripes, the name and the logo were glued. Now it's starting to look like I've imagined. |
 |
| Before installing the windows, I was afraid that I would not get it. The old windows were bolted with felt one hundred screws per window. And certainly it has always been put in by one. The new windows should only be glued. After good advice from Richter in Kiel I ordered the new windows and the gluing system there. First the primer was applied and then the glue. Then came the windows. Before everything was well taped and prepared. To get the necessary pressure on the windows (they are slightly arched) I started with the middle windows. So I could work through the back and front windows with screw clamps. |
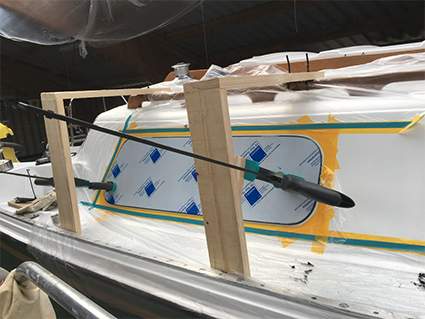 |
| In the back windows, I had then built a small wooden frame to build up the necessary pressure with spreaders. |
 |
| The front windows were used on the same principle - only the frame was much larger. |
 |
| In order to produce even pressure in the middle of the windows, I worked from the inside with suction cups and straps. |
 |
| Now that the last fittings and the guard rails were mounted, the boat was finally finished in the hall. |
 |
| On the day of the slipper, dear friends had tied a bouquet of flowers to the new boat to the pulpit. |
6 Comments
Oliver Zimmermann · 29. August 2018 at 09:16
Hallo Olaf,
herzlichen Glückwunsch zu Deinem neuen Drachen Fuchur. Es ist beeindruckend, wie viel Liebe, Arbeit und Know-how Du für das Schiffchen aufbringst. Der Erfolg gibt Dir Recht! So betrachte ich voll Anerkennung, wie unerschrocken und zeitlos eine Jaguar 25 aus den 70-er Jahren auch im Jahre 2018 noch dasteht!
Nach deisem überaus gelungenen Refit Dir und Fuchur auch für die nächsten 40 Jahre Mast- und Schotbruch und jederzeit die erforderliche Handbreit unter dem Kiel.
Herzliche Grüße
Oliver
Olaf · 29. August 2018 at 13:37
Vielen Dank Oliver!
Da ja nun schon zwei Monate seit dem Stapellauf vergangen sind, ist auch die ganze Arbeit vergessen. Nun genieße ich es jedes Mal wenn ich in den Hafen komme und mein Schmuckstück über die Förde segeln darf.
Beste Grüße
Olaf
Alexander Frühwirth · 13. June 2019 at 02:00
Hallo Olaf,
Was für ein Glück dass ich gerade über deine Seite gestolpert bin da du hier sehr viel von dem umgesetzt hast (und eigentlich noch viel mehr) was mir auch im Kopf herum schwirrt da ich seit genau 3 Tagen ebenfalls besitzer einer Jaguar 25 bin am Neusiedlersee nahe Wien, AT. könntest du mir eventuell eine Email zukommen lassen damit wir einen privateren Kanal öffnen können. Gerne würde ich mehr Details zu deiner Schleifaktion und Folierungen wissen da das Deck meiner Jaguar ähnlich aussieht wie deins zuvor. zusätzlich wollte ich Fragen wie die vordere Luke durch eine mit Plexiglas ersetzt wurde?
Freue mich schon auf deine Mail.
Liebe Grüße aus Wien,
Alex
Olaf · 13. June 2019 at 06:44
Hallo Alex,
erst einmal herzlichen Glückwunsch zum Kauf deines Boots und willkommen im elitären Klub der Jaguar-Eigner!
Ich finde es toll, dass wir über meine Seite einen Kontakt herstellen konnten. Vielleicht findest du hier ja den einen oder anderen Tip oder eine für dich nutzbare Idee, um dein Boot zu pimpen. Gerne bin ich bereit dir Fragen zu beantworten, soweit ich es denn kann. Ich bin kein Bootsbauer, noch habe ich sonst irgendeine handwerkliche Ausbildung. Ich habe mit den Jahren nur sehr viel abgeschaut und angeeignet.
Ich würde mich freuen, wenn ich deine Jaguar in den Überblick der Jaguars mit aufnehmen dürfte. Ein Foto vom Boot, der Name und der Heimathafen wäre klasse. (https://jaguar-yacht.de/jaguars-ueberblick)
Ich wünsche dir viel Spaß beim Refit deines Boots, beim Segeln dieses tollen Boots und immer die nötige Handbreit Wasser unterm Kiel.
Olaf
Alex · 13. June 2019 at 17:23
Oh sorry habe deine Antwort nicht gesehen und jetzt nochmal wo anders gepostet auf deiner Seite.(habe leider keine Notification oder so erhalten)
Danke danke bin auch überglücklich und am Samstag wird dann auch gekrant ….gebe zu ein bisschen nervös bin ich schon vor meinem ersten “Wasserdate” mit Moonlight.
Die Dame heißt Moonlight vorerst mal und liegt in Breitenbrunn am Neusiedlersee (Burgenland, Österreich) auf welche Mail adresse darf ich dir das Foto meines Rohdiamanten denn schicken?
🪙 Payment No. 007122 GET >> graph.org/The-Best-AI-Sex-Girlfriend-05-11?hs=9ad2ff8600ccd99f16d3ada3db91691c& · 14. June 2026 at 13:48
547yt8